I told you I had something in the pipeline. I've been working hard on this project the past couple of days. Hardly did much else, I was so consumed in getting this finished and getting product into my online store. And here it is - I proudly present to you Rosetta…
Rosetta has been a back burner project for a couple of months. It took me less than a minute to imagine her up. She was so perfectly formed in my mind there was no doubt how she must look if she were made.
Finally the moment was right. It was time to take Rosetta off the back burner and bring her to life. And that is what I have been doing almost nonstop. You will find gorgeous Rosetta listed in my online store. Alternatively she is available as a pattern [and instructions]. Check her out...
I created a doll that could be made by people who believe they can’t sew. There is no right or wrong way to make a silly critter. In fact the aim is to make each critter as unique as possible. Go ahead and change placement of facial features, cut out strange shapes to make the eyes and ears. Go wild with this one.
Steps 1. Using scrap fabric, cut out two body pieces*. 2. Using scrap felt, cut out ears*, chest, eyes, pupils, mouth and bottom. Design your own mouth shape and use any eye shape you want. 3. Pin chest piece to lower half of one body piece [this will become front of the doll. Stitch the chest piece to front of body. At this point you can hand sew, use a machine or simply glue it on. 4. Sew on or glue the pupils to the eyes. 5. Consider placement of eyes and mouth to front of doll – go crazy, make it unique. Sew/glue these pieces to front of doll. 6. Now for the ears. Bring the two body pieces together – wrong sides together. Slip the two ears in between the body pieces – you choose the placement and pin into position. 7. Sew/glue along the edges of the doll, but keep the bottom open for filling. 8. Now you can stuff the doll with filling. 9. At this point you have two options. [i] Sew/glue straight along the bottom to close the silly critter. Or [ii] Pin the bottom piece into the remaining opening, lining up the edges and hand sewing the silly critter closed. This bottom that will allow the silly critter to stand upright by itself.
* You have two different body and ear options to choose from.
As a side project I have begun work on drafting a wolf mask. I am making the mask for a photographer, who is planning on a 'fairytale' themed photo shoot. As always, watch this space so you can follow my design process.
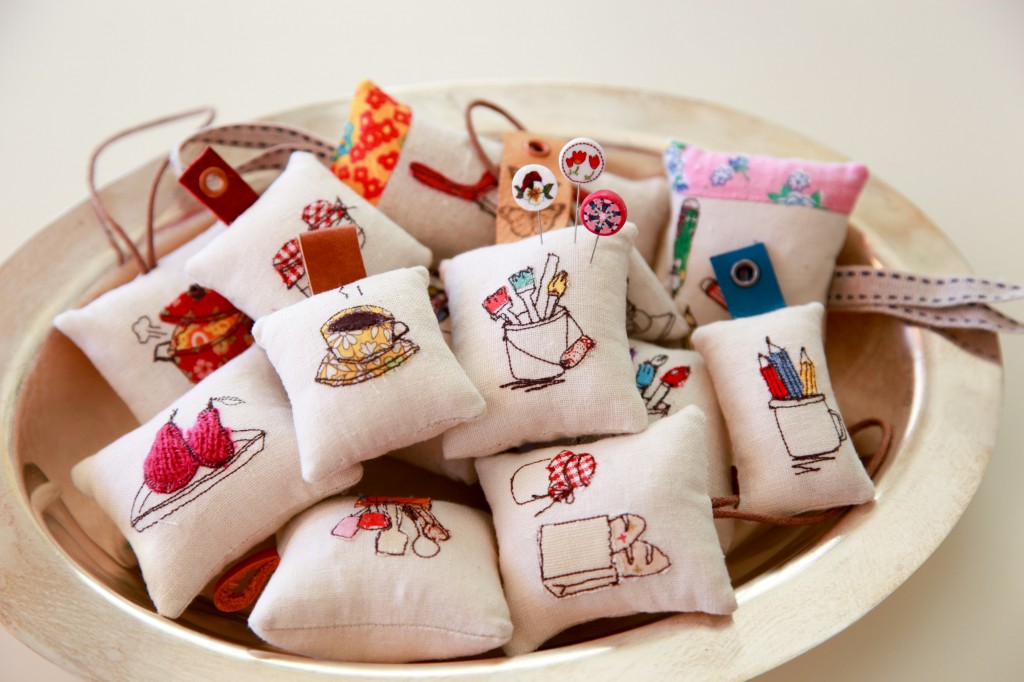
I just digitally stumbled across a photo of these lovely miniature pin cushions. These cute littlees are made by Minki and she has a visual tutee of how she made them… link here. Looking around Minki's site I'm just loving' the character she puts into her sewing illustration, and I think you will too.
I made another go at sculpting a doll head. Not perfect, but certainly a bit smoother than my previous attempt. I believe it is possible to make do with what one has on hand. But having the right tools can also make things so much easier. That said, I am having to 'make do'. By the way, this represents the last of my sculpey supply. So it'll be a while before I have anymore progress to share.
I have a new product available in my store. I have created a pattern and instructions for my beloved mermaid doll. For those uninitiated, the mermaid has an accessory fishtail which the doll's legs can be tucked into. How awesome is that?
Here's my first go at a sculpey hand. Not a bad first attempt. I would have liked having more tools for smoothing out the cracks. But I seemed to have mastered the general shape. It was important to me that I get the curve of the fingers. Have you ever noticed how your hand and fingers curl in a relaxed state?
Seriously, what is beauty? Is it how we feel about ourselves? Or is it a projection of other people's contradicting expectations? Whose opinion really counts - yours or the social collective? Beauty blogger, Em Ford, puts herself out there make up free, and make up on. For just a moment put aside your perception of people with acne, and people who wear make up, and watch this short video.
It is said that thoughts can't hurt, only actions. But that message was phrased long before we had social media. Now thoughts can hurt. And they do hurt. Remember that inbuilt filter between brain and mouth, which stops us from saying hurtful things out loud. Perhaps it is time to hotwire that filter between brain and keypad. Just a thought… Visit Em's blog… mypaleskin.blogspot.co.uk
Since finishing work on the Jean doll I have been practicing/playing with sculpey stuff. I came up with a leg and the base of a shoe. The shoe was moulded off the pictured foot.
Useful mention: I think the baking process altered the shoe, making it an ever so slightly different shape to the foot.
When I woke up this morning I did not know I would spend my day doll making. I fully anticipated a day of writing. But after a round or two of Solitare I realised that wasn't going to happen. So I turned off the laptop, pulled out the Sculpey and set to work, practicing doll sculpting [for which I am a complete noob]. After baking the doll head, for which I'm rather proud of in a very rough, round about way [Hey, It's progress! You should have seen my previous attempt]. I then decided to practice painting the face. And while I was at it, why not give the new girl a body. Before I knew it I was holding my first ever hybrid sculpted-cloth doll. Something I had been wanting to do for such a long time. She's far from perfect, and there are a lot of things I would do differently the next time round, but I love this little draft. So much so I'll make her a fifties dress and give her a name. She deserves it I think.
Progress is something that is oh so often confused with failure. So many times in my life I have done this and I am sure there are many out there who experience this. You decide to try something new. You have all these amazing visuals in your head of how you want it to turn out, and then you do it. You take the plunge, and make that idea… tangible. And, it looks like crap. So you wail about, 'what was I thinking', 'that's it, the idea was crap, I was crap'. But guess what! That crap creation is meant to happen. It is all part of the process of progress [funny how similar those words are]. I have been making cloth dolls for a number of years. Compared to my cloth doll design what I am producing now is pretty good. I had been admiring the work of modern porcelain doll artists, so I finally took the plunge into making my own sculpted dolls. How did I fare? My first sculpted doll was dreadful. My second was gawd awful. My third was… not perfection, but there was definite progress. So if your heart is into it, take the occasional break but don't give up. And what you think is failure, is actually a stepping stone to something better. It is progress.
It has been yet another week of making things and tiny, significant discoveries. Let me start by saying someone must have cast a Lost and Found spell, because on monday two things, which I had given up on ever finding, came back into my life. The cat had lost her collar months ago, which resulted in having to order a new tag and collar for that fluff ball. My eldest lost her jacket at school almost a year ago, and after daily checks in lost property it never appeared. I gave up on it by the time summer rolled around. Then this monday gone, my neighbour finds the cat collar in their garage, and one of my daughter's classmates tips me off about the jacket now being in the lost property cupboard. After those two discoveries I waited and wondered what else just might turn up. I receive rather frequent requests from my daughters to make stuff for them. Some days I can do it, other times I have to shake my head [I honestly don't think I have it in me to make a Stitch doll. Not even on a good day]. But this was a good week as I was able to fulfil my obligations as a creative parent. My eldest asked for a dream catcher. I made it using sculpey [to make the ring], yarn, feathers, a bit of glue and glitter, plus a little bottle [for catching bad spirits]. The next day my daughter said she didn't have any bad dreams because of the dream catcher. I am glad it gave her some comfort.
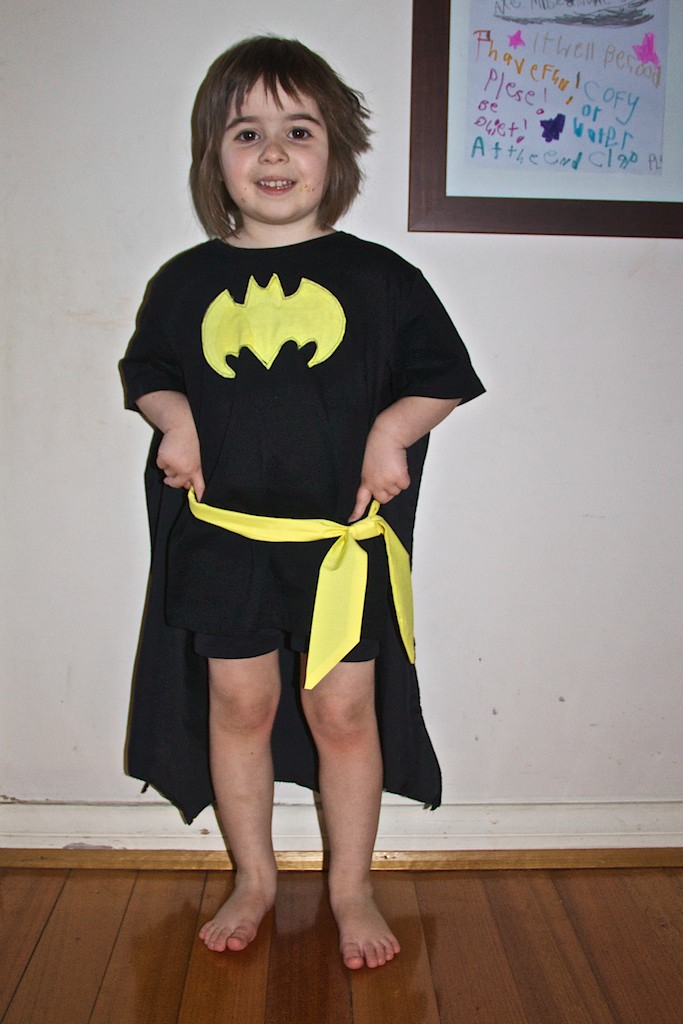
My other creation this week was a Batman/girl costume for my youngest. This was an economical construction. I picked up cheap black shorts and an oversized black shirt at Big W; Yellow and black fabric from a fabric shop. I created a template to make the yellow logo, and I sewed it to the front of the shirt and the back of the black fabric [which would become the cape]. A little cutting, shaping and sewing later, the cape was attached to the shirt and a yellow sash had been made. The sash made the long shirt look like a dress, which is just what my youngest wanted.
What will the girls have me doing next week, I wonder.
This week I have been quietly working away on a new range of sillies. I call them Silly Critters and they are possibly the quirkiest doll designs that I have come up with. Each critter is totally and utterly unique. My aim was that I not duplicate the facial expression of each little critter and that the symmetry of their faces be a little bit off. You wouldn't get that from a toy factory mass production.
New doll design & construction by Melissa Gaggiano
My youngest client put in a request for a blue sloth. So today I sit, think, draw and construct something entirely from scratch. Stay tuned for the finished sloth.
… and it it's not your socks sliding off into your shoes, then it's your undies losing elasticity and sliding off your bottom. Either way, it's time for new undergarments.


